FIRE FIGHTER ROBOT CONSTRUCTION
Parts
The Fire Fighter Robot is wirelessly controlled by a radio transmitter and receiver and monitored by a smartphone from a long distance.

The arm is showing clearly in the picture which will be able to throw the water on the fire. Also the camera is attached in the top part. This camera will act as an eye for the whole cart. After watching the fire the signals will be transmitted and the cart will follow the fire. The tanks on the cart are the fire extinguishing tanks. The valve of the extinguishing tanks will be controlled by the team. The camera fitted at the top will be wide angle camera. There will be two parts of the project. There will be electrical part and the mechanical part. This team will be doing the mechanical part in which proper dimensions of the wheel, chain, shaping of the whole cart and the placement and movement mechanism will be done.
PARTS
Here is a list of all the parts in the robot.
Note: all parts that made from steel can be replaced with plastic parts.

DRAWINGS/DIMENSIONS
 |
|---|
 |
 |
 |
 |
 |
 |
 |
 |
 |
 |
 |
 |
 |
 |
 |
 |
 |


TOP SECTION
The Top Section Of The Fire Fighter Robot
Methods
3D modeling all top parts with drawings.
Buying all the necessary parts for the top suction of the robot such as a 360 degrees’ camera and fluid tank with pump from online stores such as Amazon.
3D printing all the other top parts such as the camera base.
Testing the geometry and durability of the parts before assembly.

BOTTOM SECTION
The Bottom Section Of The Fire Fighter Robot
Methods
3D modeling all bottom parts with drawings.
Buying all the necessary parts such as a battery, wires, switches, chassis with wheels, and more from online stores such as Amazon.
3D printing all the other bottom parts such as the front and back bumpers, PCB base and battery base.
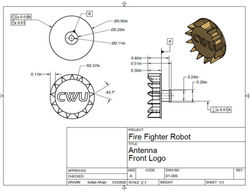
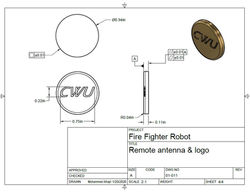
CNC milling and lathe machining the front logo of the robot that will also perform as an antenna for the receiver.
Testing the geometry and durability of the parts before assembly.

DESIGN MANUFACTURING ISSUES / MODIFICATIONS
Top Section / Bottom Section
A couple of issues in the top section of the robot and its remote controller appeared during the test. The issue in the top section was from the robotic arm holder widget, as it wasn't denned enough to hold the robotic arm, so it was reprinted by 15% extra infill density, and that solved the issue.
The other issue was from the remote controller of the robot as the Forward and Right buttons didn't function at all. After troubleshooting the remote circuit board, there was a tiny short between the two buttons, which made them both share the same output, and the microcontroller didn't respond to the request of the button. The remote controller issue was resolved by scratching away the circuit-short trace on the PCB.

EXPLODED VIEW ANIMATION
part by part...